Send Symfony application logs to Slack with Monolog
Published on 2019-03-14 • Modified on 2020-05-14
In this post, we will see how to send logs to Slack. Typical usage is, of course, to send critical errors to be warned in real-time and be able to fix the issues quickly. But we can also send other types of notifications. Let's go! 😎
» Published in "A week of Symfony 637" (11-17 March 2019).
[2020-05-14]: Update for Monolog 3.5, the loggers can now be auto-wired.
Configuration
As this Symfony project directly uses this code, you are sure it is up to date. If you use Symfony 4.4/3.4, it should be OK, you will have to do small modifications to use the parameters.yml file instead of the .env file for parameters, and you will have to declare the logger service. This blog post uses the following components:
- PHP 8.4
- Symfony 8.1.0
Slack API Setup
When I started to write this tutorial, I still was using an old API Token. So let's do this the right way. The first thing is to create a Slack application.
Access this page (sign-in before) and hit the button. Fill out the form, choose your workspace and validate. Your Slack application is now created.
Now we have to give our slack application the right to post on a given channel. This can be done in the Features > OAuth & Permissions page. Go to the Scopes section, click on the and select the rights:
- chat:write
- chat:write.public
Then click on the button.
PS: Be careful that if it's a private channel you want to publish to, you will have to add the chat:write:user scope.
To be able to use this API, we need an OAuth token. To get it, click on the "Install app" link on the left menu. It looks like this: xoxp-1111111-22222222-33333333-aaaaaaaaaaaaaaaaaaaaaa.
In your .env file, add a SLACK_TOKEN parameter:
SLACK_TOKEN=xoxp-1111111-22222222-33333333-aaaaaaaaaaaaaaaaaaaaaaIn the .env.dist file also add this key. Here, I like to add the URL of the service where the token can be accessed or changed. This will save you time later when you will have forgotten how to obtain this token. Change the fake app id with your application one. It's a nine length string, it's in the URL of the page, or you can get it in the Basic Information > Credential page, it is the APP ID parameter.
SLACK_TOKEN=https://api.slack.com/apps/ABCDEFGHI/install-on-teamNever commit an API key!
The Symfony setup
Now that we have configured the Slack API. Let's see how to use it in our Symfony application. First, create a config/packages/monolog.yaml file. As logs environments are quite different in dev and prod, this file may not exists, but we will use it to simplify the setup. Add the following configuration:
# config/packages/monolog.yaml
parameters:
    slack_token: '%env(SLACK_TOKEN)%'
    slack_bot_name: '@@slack'
    slack_channel: '#strangebuzz'

monolog:
    channels: ['strangebuzz'] # Change the channel name with your own one
We introduce several parameters, the token we've just created, we get it from the environment. The bot name that will be used to publish our messages. And the channel on which the messages will be posted. Below, we introduce a specific channel we will see later. Now that we defined these parameters let's modify our prod monolog setup. Indeed, in dev, we don't need this. Open your config/packages/prod/monolog.yaml file and add the two handlers after the Slack section: (this file is the real file used by this website)
# config/packages/prod/monolog.yaml
monolog:
    handlers:
        main:
            type: fingers_crossed
            action_level: critical
            handler: nested
            excluded_http_codes: [404, 405]
        nested:
            type: stream
            path: "%kernel.logs_dir%/%kernel.environment%.log"
            level: debug
        console:
            type:   console
            process_psr_3_messages: false
            channels: ["!event", "!doctrine"]

        # Slack ————————————————————————————————————————————————————————————————

        # Critical errors only
        slack_errors:
            type:        slack
            token:       '%slack_token%'
            channel:     '%slack_channel%'
            bot_name:    '%slack_bot_name%'
            icon_emoji:  ':ghost:' # 👻
            level:         critical
            include_extra: true

        # Application's messages
        slack:
            type:        slack
            token:       '%slack_token%'
            channel:     '%slack_channel%'
            bot_name:    '%slack_bot_name%'
            icon_emoji:  ":heavy_check_mark:" # ✅
            level:       debug
            include_extra: true
            channels:    ['strangebuzz']
As you can see, we introduced two new handlers. The first one will be responsible for forwarding critical errors to Slack, and the second one will allow us to send arbitrary messages. (notices or whatever you want). In both cases, we use the parameters we introduced in the main monolog configuration file. Check out the full SlackHandler configuration.
Usage
Now that our configuration is OK. Let's test this. As we modified the prod env only, we must use the prod env also locally to be able to test what we just added. So, in your .env file, let's switch to the prod env and don't forget to clear all the cache. Now, to test, in a controller, raise an exception, for example:
throw new \RuntimeException('Hello Ghost!');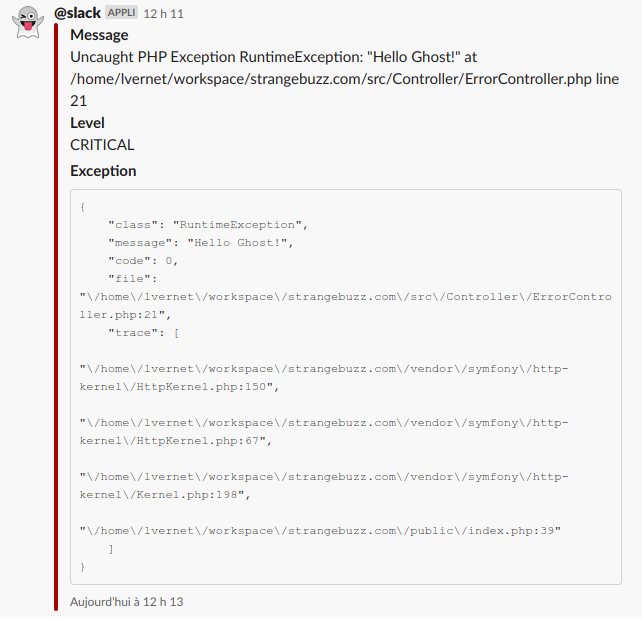
This is what you should see on your slack channel when there is a critical error. Note that the 👻 emoji is what we configured in the icon_emoji parameter of our handler.
PS: If you want to include extra information in your logs, check out this snippet.
Now that the error handler works let's have a look at the second one. In this case, we will log something on purpose. Let's see how to use this handler in a controller, check out the following code: (there is also an action to raise a critical error)
<?php

declare(strict_types=1);

// src/Controller/SlackController.php

namespace App\Controller;

use Psr\Log\LoggerInterface;
use Symfony\Component\HttpFoundation\Response;
use Symfony\Component\Routing\Attribute\Route;

/**
 * Slack debugging stuff.
 */
#[Route(path: '/slack', name: 'slack_')]
final class SlackController extends AbstractController
{
    /**
     * This is a mini action to test the "slack_errors" Monolog hanlder.
     * The final route is: /slack/testError.
     */
    #[Route(path: '/testError', name: 'test_error')]
    public function testError(): Response
    {
        throw new \RuntimeException('Hello Ghost! 👻');
    }

    /**
     * This is a mini action to test the "slack" Monolog hanlder.
     * The final route is: /slack/testInfo.
     */
    #[Route(path: '/testInfo', name: 'test_info')]
    public function testInfo(LoggerInterface $strangebuzzLogger): Response
    {
        $strangebuzzLogger->info('This is an example for the blog post! Check! ✅');

        return $this->json(['success' => true]);
    }
}
As you can see, we inject a logger service into our controller function. As of Monolog 3.5, the service can be automatically auto-wired. To see the available loggers, you can type in your console:
php bin/console debug:autowiring loggerIf you can't use autowiring, you can bind the named service like this:
# config/services.yaml
services:
    _defaults:
        bind:
            $strangebuzzLogger: '@monolog.logger.strangebuzz'
Now we are done, access /slack/testInfo and the message should appear on your slack channel. The display will be different because as it isn't an error, there is no exception to display but only the message that was sent by the application.

Of course, you can use all the different logging levels provided by the PSR-3 Logger interface.
That's it! I hope you like it. Check out the links below to have additional information related to the post. As always, feedback, likes and retweets are welcome. (see the box below) See you! COil. 😊
The Slack API The Symfony doc More on Stackoverflow
They gave feedback and helped me to fix errors and typos in this article; many thanks to Dan_borisov. 👍
Call to action
Did you like this post? You can help me back in several ways: (use the "reply" link on the right to comment or to contact me )
- Report any error/typo.
- Report something that could be improved.
- Like and repost!
- Follow me on Bluesky 🦋
- Subscribe to the RSS feed.
- Click on the More on Stackoverflow buttons to make me win "Announcer" badges 🏅.
Thank you for reading! And see you soon on Strangebuzz! 😉
